导航
开始使用 Laminas
表单和操作
添加一个新Album
我们现在可以编写添加新Album的功能了。这里将会有两部分去完成:
- 为用户显示一个提交信息的表单。
- 提交表单信息并且储存到数据库中。
我们将使用 laminas-form 来完成这个工作。laminas-form 管理表单的输入信息,同时也负责表单数据
的验证,验证工作将会由 zend-inputfilter 组件来完成。我们将创建一个集成自
Laminas\Form\Form 的类 Album\Form\AlbumForm。在文件
module/Album/src/Form/AlbumForm.php 内添加如下信息:
namespace Album\Form;

use Laminas\Form\Form;

class AlbumForm extends Form
{
    public function __construct($name = null)
    {
        // We will ignore the name provided to the constructor
        parent::__construct('album');

        $this->add([
            'name' => 'id',
            'type' => 'hidden',
        ]);
        $this->add([
            'name' => 'title',
            'type' => 'text',
            'options' => [
                'label' => 'Title',
            ],
        ]);
        $this->add([
            'name' => 'artist',
            'type' => 'text',
            'options' => [
                'label' => 'Artist',
            ],
        ]);
        $this->add([
            'name' => 'submit',
            'type' => 'submit',
            'attributes' => [
                'value' => 'Go',
                'id'    => 'submitbutton',
            ],
        ]);
    }
}
在 AlbumForm 的构造函数内我们将会完成几个步骤。首先,我们将会调用父类的构造函数,
并且设置一个表单名称。接下来我们创建四个表单元素:id,title,artist,以及一个submit
按钮。每项我们都将设置属性和选项,包括显示的标签。
表单方法
HTML表单提供
POST和GET的方式,laminas-form 默认使用POST; 因此我们不必要明确的制定其属性。 如果您想要制定GET方式,我们需要在构造函数中明确的制定:$this->setAttribute('method', 'GET');
我们同时需要为当前表单设置验证方法,参见 laminas-inputfilter
为输入框提供的通用验证机制。同样也提供了一个接口 InputFilterAwareInterface,
为了给表单绑定输入验证 zend-form 将需要这个接口的实现。 我们将在 Album 类中添加。
// module/Album/src/Model/Album.php:
namespace Album\Model;

// Add the following import statements:
use DomainException;
use Laminas\Filter\StringTrim;
use Laminas\Filter\StripTags;
use Laminas\Filter\ToInt;
use Laminas\InputFilter\InputFilter;
use Laminas\InputFilter\InputFilterAwareInterface;
use Laminas\InputFilter\InputFilterInterface;
use Laminas\Validator\StringLength;

class Album implements InputFilterAwareInterface
{
    public $id;
    public $artist;
    public $title;

    // Add this property:
    private $inputFilter;

    public function exchangeArray(array $data)
    {
        $this->id     = !empty($data['id']) ? $data['id'] : null;
        $this->artist = !empty($data['artist']) ? $data['artist'] : null;
        $this->title  = !empty($data['title']) ? $data['title'] : null;
    }

    /* Add the following methods: */

    public function setInputFilter(InputFilterInterface $inputFilter)
    {
        throw new DomainException(sprintf(
            '%s does not allow injection of an alternate input filter',
            __CLASS__
        ));
    }

    public function getInputFilter()
    {
        if ($this->inputFilter) {
            return $this->inputFilter;
        }

        $inputFilter = new InputFilter();

        $inputFilter->add([
            'name' => 'id',
            'required' => true,
            'filters' => [
                ['name' => ToInt::class],
            ],
        ]);

        $inputFilter->add([
            'name' => 'artist',
            'required' => true,
            'filters' => [
                ['name' => StripTags::class],
                ['name' => StringTrim::class],
            ],
            'validators' => [
                [
                    'name' => StringLength::class,
                    'options' => [
                        'encoding' => 'UTF-8',
                        'min' => 1,
                        'max' => 100,
                    ],
                ],
            ],
        ]);

        $inputFilter->add([
            'name' => 'title',
            'required' => true,
            'filters' => [
                ['name' => StripTags::class],
                ['name' => StringTrim::class],
            ],
            'validators' => [
                [
                    'name' => StringLength::class,
                    'options' => [
                        'encoding' => 'UTF-8',
                        'min' => 1,
                        'max' => 100,
                    ],
                ],
            ],
        ]);

        $this->inputFilter = $inputFilter;
        return $this->inputFilter;
    }
}
InputFilterAwareInterface 顶一个 setInputFilter() 和 getInputFilter()
两个方法。我们只需要时实现 getInputFilter(),所以我们为 setInputFilter()
提供了一个异常抛出。
在 getInputFilter() 内,我们使用 InputFilter 来添加我们需要的输入验证。
我们依次为每个表单项添加希望验证的属性信息。id 项添加一个 int 验证,以确保
只接收整数。对于文本元素,万能添加两个验证信息, StripTags 以及 StringTrim
删除不需要的 HTML 以及必须要的空格。同时需要 required 以及 StringLength
验证确保用户输入指定范围内的字符数,以便存入数据库。
现在我们需要获取表单并显示然后处理提交的信息。这些都将在 AlbumController::addAction()
内完成:
// module/Album/src/Controller/AlbumController.php:

// Add the following import statements at the top of the file:
use Album\Form\AlbumForm;
use Album\Model\Album;

class AlbumController extends AbstractActionController
{
    /* ... */

    /* Update the following method to read as follows: */
    public function addAction()
    {
        $form = new AlbumForm();
        $form->get('submit')->setValue('Add');

        $request = $this->getRequest();

        if (! $request->isPost()) {
            return ['form' => $form];
        }

        $album = new Album();
        $form->setInputFilter($album->getInputFilter());
        $form->setData($request->getPost());

        if (! $form->isValid()) {
            return ['form' => $form];
        }

        $album->exchangeArray($form->getData());
        $this->table->saveAlbum($album);
        return $this->redirect()->toRoute('album');
    }

    /* ... */
}
向 Album 以及 AlbumForm 类中添加信息后,我们回到 addAction()。让我们详细的
查看 addAction() 中的代码:
$form = new AlbumForm();
$form->get('submit')->setValue('Add');
我们实例化了 AlbumForm 并且设置 submit 按钮的值为 "Add"。我们这样做是为了在编辑专辑
的时候可以重用表单的配置信息,以便可以设置不同的标签。
$request = $this->getRequest();

if (! $request->isPost()) {
    return ['form' => $form];
}
如果非 `POST 请求,表单值将不会被提交,而是展示一个表单,laminas-mvc允许我们在需要的时候 返回一个数组以替代视图模型,如果你这样做它将会使用这个数组自动创建一个视图模型:
$album = new Album();
$form->setInputFilter($album->getInputFilter());
$form->setData($request->getPost());
此时,我们获取一个提交的表单,我们将创建一个 Album 实例,并且通过其来进行表单验证,
另外我们也通过其来向表单中传递请求的实例。
if (! $form->isValid()) {
    return ['form' => $form];
}
如果验证失败,我们重新展示表单。此时的表单组件将会指出验证失败项,以及为什么验证失败, 这些信息都将被传递给视图。
$album->exchangeArray($form->getData());
$this->table->saveAlbum($album);
如果表单验证通过,我们将从表单中抓取数据并且使用模型的 saveAlbum() 方法将数据储存到
数据库中。
return $this->redirect()->toRoute('album');一旦我们保存了新的专辑行,我们将使用控制器插件 Redirect 跳转到专辑列表页。
现在我需要在 add.phtml 视图脚本中渲染表单:
<?php
// module/Album/view/album/album/add.phtml:

$title = 'Add new album';
$this->headTitle($title);
?>
<h1><?= $this->escapeHtml($title) ?></h1>
<?php
$form->setAttribute('action', $this->url('album', ['action' => 'add']));
$form->prepare();

echo $this->form()->openTag($form);
echo $this->formHidden($form->get('id'));
echo $this->formRow($form->get('title'));
echo $this->formRow($form->get('artist'));
echo $this->formSubmit($form->get('submit'));
echo $this->form()->closeTag();
首先我们显示一个标题,接下来开始渲染表单。zend-form 提供了一些视图助手使得这项工作变得
异常轻松。form() 视图助手包含 openTag() 以及 closeTag() 两个方法,用来数据表单
头和尾。每个项都具有一个说明标签,我们使用 formRow() 来渲染这些标签、输入框以及验证
失败后的错误信息。另有隐藏以及提交这两个独立的没有验证信息的项,我们使用 formHidden()
以及 formSubmit() 来渲染。
另外,渲染视表单的过程中我们可以直接只用绑定的 formCollection 视图脚本。例如,上面
所有的表单项渲染都可以使用下面代码代替:
echo $this->formCollection($form);这边遍历所有的表单元素,调用适当的标签,元素以及每项中中的错误信息,但是 formCollection($form)
中仍然不包括表单的头尾信息。这将帮助您在接受默认HTML呈现方式的情况下减少视图脚本的复杂性。
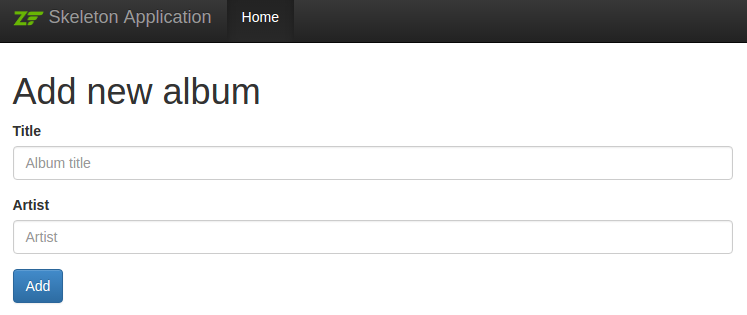
您现在可以使用首页的 "Add new album" 链接,去添加一个新专辑,显示情况如下:

这看起来不是好!我们可以使用了骨架中 Bootstrap 这个 CSS 框架,用专门的标记信息用来 呈现表单!我们可以使用下面的方法来完善我们的视图脚本:
- 为元素添加标记信息.
- 分别渲染 labels, elements, 以及错误信息.
- 为元素添加属性.
按照如下方式更新 add.phtml 视图脚本:
<?php
$title = 'Add new album';
$this->headTitle($title);
?>
<h1><?= $this->escapeHtml($title) ?></h1>
<?php
// This provides a default CSS class and placeholder text for the title element:
$album = $form->get('title');
$album->setAttribute('class', 'form-control');
$album->setAttribute('placeholder', 'Album title');

// This provides a default CSS class and placeholder text for the artist element:
$artist = $form->get('artist');
$artist->setAttribute('class', 'form-control');
$artist->setAttribute('placeholder', 'Artist');

// This provides CSS classes for the submit button:
$submit = $form->get('submit');
$submit->setAttribute('class', 'btn btn-primary');

$form->setAttribute('action', $this->url('album', ['action' => 'add']));
$form->prepare();

echo $this->form()->openTag($form);
?>
<?php // Wrap the elements in divs marked as form groups, and render the
      // label, element, and errors separately within ?>
<div class="form-group">
    <?= $this->formLabel($album) ?>
    <?= $this->formElement($album) ?>
    <?= $this->formElementErrors()->render($album, ['class' => 'help-block']) ?>
</div>

<div class="form-group">
    <?= $this->formLabel($artist) ?>
    <?= $this->formElement($artist) ?>
    <?= $this->formElementErrors()->render($artist, ['class' => 'help-block']) ?>
</div>

<?php
echo $this->formSubmit($submit);
echo $this->formHidden($form->get('id'));
echo $this->form()->closeTag();
结果将会如下呈现:
以上是为了展示表单渲染中一些默认的特征以及一些自定义的方式。你可以为您的站点设置 任何想要的标记信息。
编辑专辑
编辑专辑有点类似于添加一个,代码也是比较接近的,现在我们使用 AlbumController 中的
editAction() :
// module/Album/src/Controller/AlbumController.php:
// ...

    public function editAction()
    {
        $id = (int) $this->params()->fromRoute('id', 0);

        if (0 === $id) {
            return $this->redirect()->toRoute('album', ['action' => 'add']);
        }

        // Retrieve the album with the specified id. Doing so raises
        // an exception if the album is not found, which should result
        // in redirecting to the landing page.
        try {
            $album = $this->table->getAlbum($id);
        } catch (\Exception $e) {
            return $this->redirect()->toRoute('album', ['action' => 'index']);
        }

        $form = new AlbumForm();
        $form->bind($album);
        $form->get('submit')->setAttribute('value', 'Edit');

        $request = $this->getRequest();
        $viewData = ['id' => $id, 'form' => $form];

        if (! $request->isPost()) {
            return $viewData;
        }

        $form->setInputFilter($album->getInputFilter());
        $form->setData($request->getPost());

        if (! $form->isValid()) {
            return $viewData;
        }

        $this->table->saveAlbum($album);

        // Redirect to album list
        return $this->redirect()->toRoute('album', ['action' => 'index']);
    }
这段代码看起来如此熟悉。接下来让我们看看和添加专辑的不同之处。首先, id 是从路由中
匹配待的并且使用其来加载专辑并且编辑:
$id = (int) $this->params()->fromRoute('id', 0);

if (0 === $id) {
    return $this->redirect()->toRoute('album', ['action' => 'add']);
}

// Retrieve the album with the specified id. Doing so raises
// an exception if the album is not found, which should result
// in redirecting to the landing page.
try {
    $album = $this->table->getAlbum($id);
} catch (\Exception $e) {
    return $this->redirect()->toRoute('album', ['action' => 'index']);
}
params 是一个控制器插件,可以很方便的从路由中取出匹配值。我们使用它取出从我们创建的
Album 模块中 module.config.php 文件里的 id 值。如果 id 为0,将会跳转到添加操作中,
否则,我们将从数据库中获取 album 实体。
我们必须确保对应 id 的专辑能被找到。如果不能方法将会抛出一个异常。我们可以捕获异常
并且将用户重定向到首页。
$form = new AlbumForm();
$form->bind($album);
$form->get('submit')->setAttribute('value', 'Edit');
表单的 bind() 方法将模型赋值给表单。这将会有两种用途:
- 当现实表单的时候,可以为每个元素绑定初始值。
- 通过
isValid()验证通过后, 表单数据将会被传递会模型。
这些操作都是使用 hydrator 对象类完成的。有几种 hydrators,默认使用的是
Zend\Hydrator\ArraySerializable,它会事先在模型中查找 getArrayCopy()
以及 exchangeArray() 这两个方法。我们已经在 Album 实体中添加了 exchangeArray()
现在我们需要去添加 getArrayCopy():
// module/Album/src/Model/Album.php:
// ...

    public function exchangeArray($data)
    {
        $this->id     = isset($data['id']) ? $data['id'] : null;
        $this->artist = isset($data['artist']) ? $data['artist'] : null;
        $this->title  = isset($data['title']) ? $data['title'] : null;
    }

    // Add the following method:
    public function getArrayCopy()
    {
        return [
            'id'     => $this->id,
            'artist' => $this->artist,
            'title'  => $this->title,
        ];
    }

// ...
由于使用 bind()来实现 hydrator,我们不需要自己填充表单数据到 $album 中,就可以直接
调用 saveAlbum() 方法来将数据储存到数据库中。
视图模板 edit.phtml 同样和添加表单的视图类似:
<?php
// module/Album/view/album/album/edit.phtml:

$title = 'Edit album';
$this->headTitle($title);
?>
<h1><?= $this->escapeHtml($title) ?></h1>
<?php
$album = $form->get('title');
$album->setAttribute('class', 'form-control');
$album->setAttribute('placeholder', 'Album title');

$artist = $form->get('artist');
$artist->setAttribute('class', 'form-control');
$artist->setAttribute('placeholder', 'Artist');

$submit = $form->get('submit');
$submit->setAttribute('class', 'btn btn-primary');

$form->setAttribute('action', $this->url('album', [
    'action' => 'edit',
    'id'     => $id,
]));
$form->prepare();

echo $this->form()->openTag($form);
?>
<div class="form-group">
    <?= $this->formLabel($album) ?>
    <?= $this->formElement($album) ?>
    <?= $this->formElementErrors()->render($album, ['class' => 'help-block']) ?>
</div>

<div class="form-group">
    <?= $this->formLabel($artist) ?>
    <?= $this->formElement($artist) ?>
    <?= $this->formElementErrors()->render($artist, ['class' => 'help-block']) ?>
</div>

<?php
echo $this->formSubmit($submit);
echo $this->formHidden($form->get('id'));
echo $this->form()->closeTag();
唯一的改变就是我们使用了 Edit Album 的标题,并且设置了表单的 action 到 'edit' 方法上。.
现在您就可以去编辑专辑了。
删除一个 album
为了完善我们的专辑应用,我们需要去添加删除操作,我们已经在每个专辑列表的后天添加了删除 链接。实际情况应该是我们点击链接就会去删除专辑,但是这样容易出现误操作。请记住我们的 HTTP 规范,我们不应该使用GET方法来实现一个不可逆的操作,应该使用 POST 方法来代替。 我们最好在点击删除链接后显示一个确认的表单,如果我们点击 "yes",我们将会删除信息。 由于我们的表单很简单,我们将直接将代码写到我们的视图中(zend-form可以作为一个可选项!)。
让我们开始在 AlbumController::deleteAction() 中编写代码:
// module/Album/src/Controller/AlbumController.php:
//...
    // Add content to the following method:
    public function deleteAction()
    {
        $id = (int) $this->params()->fromRoute('id', 0);
        if (!$id) {
            return $this->redirect()->toRoute('album');
        }

        $request = $this->getRequest();
        if ($request->isPost()) {
            $del = $request->getPost('del', 'No');

            if ($del == 'Yes') {
                $id = (int) $request->getPost('id');
                $this->table->deleteAlbum($id);
            }

            // Redirect to list of albums
            return $this->redirect()->toRoute('album');
        }

        return [
            'id'    => $id,
            'album' => $this->table->getAlbum($id),
        ];
    }
//...
首先,我们从路由中获取 id,并且检查请求对象是够 isPost(),以确保我们显示确认页还是进行
删除操作。我们使用表单对象的 deleteAlbum() 方法来删除专辑,并且在删除后跳转到专辑列表页
如果非 POST 请求,我们根据 id 从数据库中取回专辑信息,并在视图中显示。
视图脚本是一个非常简单的表单:
<?php
// module/Album/view/album/album/delete.phtml:

$title = 'Delete album';
$url   = $this->url('album', ['action' => 'delete', 'id' => $id]);

$this->headTitle($title);
?>
<h1><?= $this->escapeHtml($title) ?></h1>

<p>
    Are you sure that you want to delete
    "<?= $this->escapeHtml($album->title) ?>" by
    "<?= $this->escapeHtml($album->artist) ?>"?
</p>

<form action="<?= $url ?>" method="post">
<div class="form-group">
    <input type="hidden" name="id" value="<?= (int) $album->id ?>" />
    <input type="submit" class="btn btn-danger" name="del" value="Yes" />
    <input type="submit" class="btn btn-success" name="del" value="No" />
</div>
</form>
在视图脚本中我们为用户显示一个确认信息的表单,并且提供 "Yes" 和 "No" 两个按钮, 在操作方法中,我们检查是否为 "Yes",如果是则执行删除操作。
Ensuring that the home page displays the list of albums
确保首页显示 albums 列表
最后一点。当前主页 http://laminas-mvc-tutorial.localhost/ 不会显示专辑列表。
这是由于我们在模块的 module.config.php 文件中设置了 Application 为主页。
打开 module/Application/config/module.config.php 找到首页路由:
'home' => [
    'type' => \Laminas\Router\Http\Literal::class,
    'options' => [
        'route'    => '/',
        'defaults' => [
            'controller' => Controller\IndexController::class,
            'action'     => 'index',
        ],
    ],
],
在文件顶部引入 Album\Controller\AlbumController:
use Album\Controller\AlbumController;and change the controller from Controller\IndexController::class to AlbumController::class:
'home' => [
    'type' => \Laminas\Router\Http\Literal::class,
    'options' => [
        'route'    => '/',
        'defaults' => [
            'controller' => AlbumController::class, // <-- change here
            'action'     => 'index',
        ],
    ],
],
现在,我们拥有了一个完整的可正常工作的应用了!
发现错误或者想为此文档做贡献? 来 GitHub 编辑!